「ソリッドステートドライブ/メモリセルの消去」の版間の差分
(→トラブルシューティング: 追加) |
(→参照: 追加) |
||
| 269行目: | 269行目: | ||
一部の [[UEFI]] 実装は、存在しないファイルを参照しているブートエントリをシステムのスタートアップ時に削除します。メモリセルの消去を行った後にバックアップからシステムを復元する場合は、[[efibootmgr]] を使うか [[ブートローダー]]を再インストールして、ブートエントリを復元してください。 |
一部の [[UEFI]] 実装は、存在しないファイルを参照しているブートエントリをシステムのスタートアップ時に削除します。メモリセルの消去を行った後にバックアップからシステムを復元する場合は、[[efibootmgr]] を使うか [[ブートローダー]]を再インストールして、ブートエントリを復元してください。 |
||
| + | |||
| + | == 参照 == |
||
| + | |||
| + | * [https://web.archive.org/web/20190326142043/http://forum.notebookreview.com/threads/secure-erase-hdds-ssds-sata-nvme-using-hdparm-nvme-cli-on-linux.827525/ Secure Erase HDDs/SSDs (SATA/NVMe) using hdparm & nvme-cli on Linux] (2019): 画像付きの良いチュートリアル |
||
| + | * [https://nvmexpress.org/wp-content/uploads/Session-3-Verifying-SSD-Sanitization_Micron_Toshiba_Final-as-of-4.26.pdf Verifying SSD Sanitization] |
||
2023年3月2日 (木) 07:59時点における版
関連記事
ときに、SSD のセルを完全に消去して、SSD 製造時の状態に完全に戻し、製造時の書き込み性能を取り戻したいと思うこともあるでしょう。たとえ SSD がネイティブ TRIM に対応していても、時が経つにつれて書き込み性能は下がっていくことが知られています。TRIM はあくまでファイルの削除に対する防護であり、差分保存などの操作には効果がありません。
Secure Erase を行っても、SSD セルのウェアレベリングの状態はリセットできません。寿命を迎えつつあるドライブの場合、短い間は書き込み可能になるかもしれませんが、限られた量の書き込み後は依然としてできなくなります。
目次
SATA ドライブ
手順 1 - ドライブのセキュリティが凍っていないことを確認
以下のコマンドを実行してください:
# hdparm -I /dev/sdX
上記のコマンドで "frozen" と出力される場合、次の手順に進むことはできません。オペレーティングシステムが起動する前に BIOS が "SECURITY FREEZE" コマンドを実行して ATA Secure Erase コマンドをブロックしてしまっています。
解決方法としては、システムをサスペンドすることで、復帰時に凍結状態が解除されることがあります。それで解決しない場合、データケーブルを (電源が入った状態で) 抜き差しする方法があります。SATA のデータケーブルを切断するとカーネルがクラッシュする場合、SATA の電源ケーブルとデータケーブルの両方を素早く抜き差ししてみてください。それでも SATA ケーブルを抜くとカーネルがクラッシュしてしまうときは、BIOS で AHCI が有効になっていることを確認してください (AHCI が有効になっていれば抜き差しを行ってもクラッシュしません)。ホットプラグがサポートされている USB-to-SATA アダプタを使用する手段もあります。hdparm は USB 経由でも使えます。
Dell のコンピュータ
コマンドによって "frozen" と出力される場合、以下の手順を試してみてください:
- 起動時に F2 を押して Dell の BIOS を起動する。
- BIOS から Internal HDD Password を設定する。
- 変更を適用して再起動する。
- Dell Security Manager によってパスワードが要求されたときに、パスワードを入力せずに Escape を押す。ドライブが解錠されないかわりに凍結もされません。
- 下の手順3に進む。
手順 2 - ユーザーパスワードを設定してセキュリティを有効化
一時的に使用するものなので、パスワードは何でもかまいません。Secure Erase を実行した後にパスワードは NULL に戻ります。以下の例では、パスワードとして "PasSWorD" を使っています:
# hdparm --user-master u --security-set-pass PasSWorD /dev/sdX
security_password="PasSWorD"
/dev/sdX:
Issuing SECURITY_SET_PASS command, password="PasSWorD", user=user, mode=high
サニティチェックとして、以下のコマンドを実行:
# hdparm -I /dev/sdX
上記のコマンドは "enabled" と出力するはずです:
Security:
        Master password revision code = 65534
                supported
                enabled
        not     locked
        not     frozen
        not     expired: security count
                supported: enhanced erase
        Security level high
        2min for SECURITY ERASE UNIT. 2min for ENHANCED SECURITY ERASE UNIT.
手順 3 - ATA Secure Erase コマンドを実行
最後に Secure Erase コマンドを実行することで、デバイスの BIOS によって SSD の中身を消去させます。上の例で、コマンドによって以下のように出力されていることに注意してください:
2min for SECURITY ERASE UNIT. 2min for ENHANCED SECURITY ERASE UNIT.
ATA の仕様書によれば強化型のセキュリティ消去 (--security-erase-enhanced) は入念な消去を実行します。両方のコマンドの予想完了時間が等しい場合、ドライブのメーカーが仕様に従っておらず、どちらのコマンドでも同じ消去を行うようになっていることを意味します。消去にかかる時間 (2分など) が短いのはデバイスが自己暗号化を行っていて、BIOS によって消去されるのは内部の暗号鍵だけで、全てのデータセルが上書きされるわけではないということを示します [2]。
# hdparm --user-master u --security-erase PasSWorD /dev/sdX
コマンドが完了するまでしばらく待機してください。以下の Intel X25-M 80GB SSD の場合で40秒かかっています。
security_password="PasSWorD"
/dev/sdX:
Issuing SECURITY_ERASE command, password="PasSWorD", user=user
0.000u 0.000s 0:39.71 0.0%      0+0k 0+0io 0pf+0w
消去が成功したらドライブのセキュリティは自動的に無効に設定されます (アクセスするのにパスワードは必要なくなります)。以下のコマンドを実行して確認してください:
# hdparm -I /dev/sdX
上記のコマンドは "not enabled" と出力するはずです:
Security:
        Master password revision code = 65534
                supported
        not     enabled
        not     locked
        not     frozen
        not     expired: security count
                supported: enhanced erase
        2min for SECURITY ERASE UNIT. 2min for ENHANCED SECURITY ERASE UNIT.
NVMe ドライブ
The NVMe specification defines a standardized way to format NVMe drives, since those do not use the SATA interface protocol and therefore cannot be cleared in the same way as SATA SSDs. Originally it was the nvme-format(1) command (part of the nvme-cli) which provided this feature, but while it still does Specification 1.3 added support for a dedicated nvme-sanitize(1) command. As described by Jonmichael Hands, NVMe MWG Co-Chair, Sr. Strategic Planner / Product Manager, Intel[3]:
- "These commands are used to securely erase user data from the device. This can be used when deploying a new device, retiring or at device end-of-life, using an SSD for a new application and so on. Sanitize was introduced in NVMe 1.3 specification, so before then NVMe Format was used exclusively to perform secure erase. While both options work, Sanitize is more robust for ensuring the data was properly wiped; format is good for everyday use and testing."
In order to verify what is supported by your drive, use the Identify Controller command:
# nvme id-ctrl /dev/nvme0 -H |grep "Format \|Crypto Erase\|Sanitize"
Example output:
  [1:1] : 0x1	Format NVM Supported
  [29:29] : 0	No-Deallocate After Sanitize bit in Sanitize command Supported
    [2:2] : 0	Overwrite Sanitize Operation Not Supported
    [1:1] : 0x1	Block Erase Sanitize Operation Supported
    [0:0] : 0x1	Crypto Erase Sanitize Operation Supported
  [2:2] : 0x1	Crypto Erase Supported as part of Secure Erase
  [1:1] : 0	Crypto Erase Applies to Single Namespace(s)
  [0:0] : 0	Format Applies to Single Namespace(s)
Then proceed with either format or sanitize.
Format command
The Format command is conceptually closer to a mix of hdparm and fdisk, as it allows to set low-level parameters for the drive and additionally to send a secure erase command.
nvme-format(1) gives the following details about the Secure Erase Settings (-s <ses>, --ses=<ses>) option:
- Secure Erase Settings: This field specifies whether a secure erase should be performed as part of the format and the type of the secure erase operation. The erase applies to all user data, regardless of location (e.g., within an exposed LBA, within a cache, within deallocated LBAs, etc). Defaults to 0.
Possible values :
| Value | Definitions |
|---|---|
| 0 | No secure erase operation requested |
| 1 | User Data Erase: All user data shall be erased, contents of the user data after the erase is indeterminate (e.g., the user data may be zero filled, one filled, etc). The controller may perform a cryptographic erase when a User Data Erase is requested if all user data is encrypted. |
| 2 | Cryptographic Erase: All user data shall be erased cryptographically. This is accomplished by deleting the encryption key. |
While the Format command accepts either the whole NVMe character device (e.g. /dev/nvme0) or a specific namespace block device (e.g. /dev/nvme0n1), make sure this feature is supported by your drive before triggering it. E.g. in the output of the Identify Controller command above, we see that the Crypto Erase Applies to Single Namespace(s) and Format Applies to Single Namespace(s) bits are set to zero, which according to the spec means that "the controller supports format on a per namespace basis" (see figure 249 byte row 524 "Format NVM Attributes (FNA)").
For example, to format /dev/nvme0 with a crypto erase to namespace 1:
# nvme format /dev/nvme0 -ses 2 -n 1
See nvme-format(1) for more information and important warnings regarding device/namespace selection.
Sanitize command
The Sanitize command was created to be "functionally equivalent to the command of the same name in SATA and SAS implementations"[4]. From the aforementionned article[5]:
- "According to the NVMe 1.4 specification, “a sanitize operation alters all user data in the NVM subsystem such that recovery of any previous user data from any cache, the non-volatile media, or any Controller Memory Buffer is not possible.”
- The big difference between Sanitize and Format is that sanitize ensures caches are deleted, and the process starts again after an unexpected power loss. Sanitize also supports a pattern overwrite for a secure erase operation, which is terrible for NAND endurance but can be used with other types of storage and memory classes, or for more certainty that user data cannot be recovered."
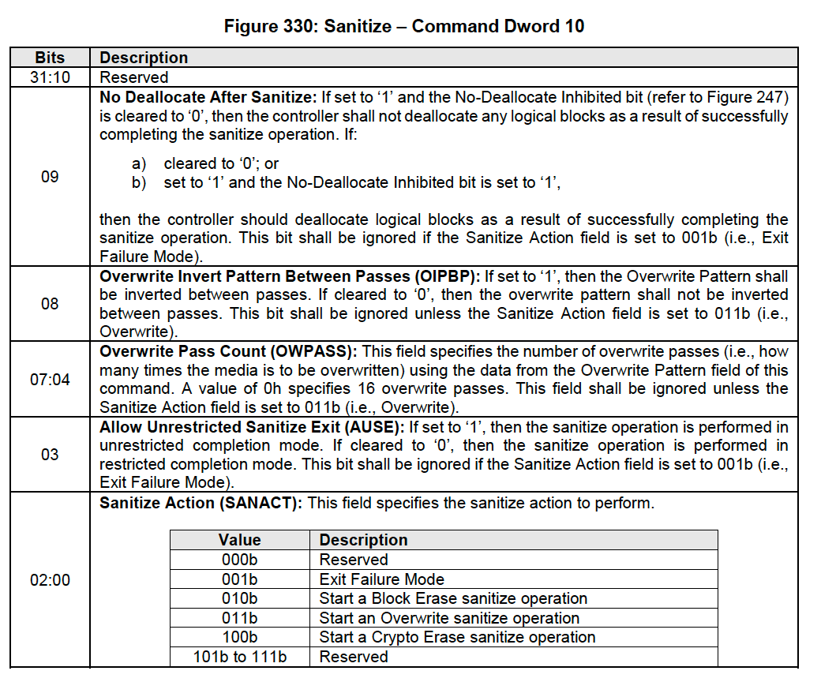
Usage and possible values for the -a/--sanact options are[6]:
-a <action>
--sanact=<action>
    Sanitize Action
    000b - Reserved
    001b - Exit Failure Mode
    010b - Start a Block Erase sanitize operation
    011b - Start an Overwrite sanitize operation
    100b - Start a Crypto Erase sanitize operation
See nvme-sanitize(1) for more informations.
You can get an estimation of the time the various methods would take on your drive (if supported):
# nvme sanitize-log /dev/nvme0
...
Estimated Time For Overwrite                   :  4294967295 (No time period reported)
Estimated Time For Block Erase                 :  174
Estimated Time For Crypto Erase                :  34
If instead you get a result such as:
# nvme sanitize-log /dev/nvme0
...
Estimated Time For Overwrite                   :  4294967295 (No time period reported)
Estimated Time For Block Erase                 :  4294967295 (No time period reported)
Estimated Time For Crypto Erase                :  4294967295 (No time period reported)
Then be sure that the operation will take a long time to complete. For reference, a Block Erase took around 2-3 hours to complete on the Intel 660p 512GB reporting those results.
To start a Crypto Erase sanitize operation:
# nvme sanitize device --sanact=4
For a Block Erase:
# nvme sanitize device -a 2
You can follow the progress with the Sanitize Log:
# nvme sanitize-log /dev/nvme0
Example output for a drive with a Crypto Erase in progress:
Sanitize Progress                      (SPROG) :  655
Sanitize Status                        (SSTAT) :  0x4
Sanitize Command Dword 10 Information (SCDW10) :  0x4
Estimated Time For Overwrite                   :  4294967295 (No time period reported)
Estimated Time For Block Erase                 :  174
Estimated Time For Crypto Erase                :  34
Estimated Time For Overwrite (No-Deallocate)   :  0
Estimated Time For Block Erase (No-Deallocate) :  0
Estimated Time For Crypto Erase (No-Deallocate):  0
When the command has completed successfully:
Sanitize Progress                      (SPROG) :  65535
Sanitize Status                        (SSTAT) :  0x101
Sanitize Command Dword 10 Information (SCDW10) :  0x4
Estimated Time For Overwrite                   :  4294967295 (No time period reported)
Estimated Time For Block Erase                 :  174
Estimated Time For Crypto Erase                :  34
Estimated Time For Overwrite (No-Deallocate)   :  0
Estimated Time For Block Erase (No-Deallocate) :  0
Estimated Time For Crypto Erase (No-Deallocate):  0
blkdiscard による一般的な方法
util-linux パッケージの blkdiscard(8) コマンドは --secure オプションを提供します。このオプションは、「セキュアな消去を行います。セキュアな消去は、ガベージコレクションによって作成された可能性のある消去ブロックのコピーもすべて削除されることを除いて、通常の消去と同じです。セキュアな消去はデバイスのサポートを必要とします。」("Perform a secure discard. A secure discard is the same as a regular discard except that all copies of the discarded blocks that were possibly created by garbage collection must also be erased. This requires support from the device.")
このコマンドを使うには、以下を実行してください:
# blkdiscard --secure /dev/device
セキュアな消去をサポートしていないデバイスの場合、-z/--zeroout オプションは、デフォルトでデバイス上の全ブロックを単に消去する代わりに、デバイスを 0 で埋めます。
blkdiscard の一般的なセキュリティに関する議論は [7] を、blkdiscard を使用してボリュームを消去する例は [8] を見てください。
トラブルシューティング
ドライブを消去した後に UEFI ブートエントリが削除された
一部の UEFI 実装は、存在しないファイルを参照しているブートエントリをシステムのスタートアップ時に削除します。メモリセルの消去を行った後にバックアップからシステムを復元する場合は、efibootmgr を使うか ブートローダーを再インストールして、ブートエントリを復元してください。
参照
- Secure Erase HDDs/SSDs (SATA/NVMe) using hdparm & nvme-cli on Linux (2019): 画像付きの良いチュートリアル
- Verifying SSD Sanitization